> ## Documentation Index
> Fetch the complete documentation index at: https://dify-6c0370d8-add-new-agent.mintlify.site/llms.txt
> Use this file to discover all available pages before exploring further.
# データソースプラグイン
⚠️ このドキュメントはAIによって自動翻訳されています。不正確な部分がある場合は、[英語版](/en/develop-plugin/dev-guides-and-walkthroughs/datasource-plugin)を参照してください。
データソースプラグインは、Dify 1.9.0で導入された新しいタイプのプラグインです。ナレッジパイプラインにおいて、ドキュメントデータソースとして機能し、パイプライン全体の起点となります。
この記事では、データソースプラグインの開発方法について、プラグインアーキテクチャ、コード例、デバッグ方法を網羅し、データソースプラグインの迅速な開発とリリースを支援します。
## 前提条件
読み進める前に、ナレッジパイプラインの基本的な理解とプラグイン開発に関する知識があることを確認してください。関連情報はこちらで確認できます:
* [ステップ2:ナレッジパイプラインオーケストレーション](/ja/use-dify/knowledge/knowledge-pipeline/knowledge-pipeline-orchestration)
* [Difyプラグイン開発:Hello Worldガイド](/ja/develop-plugin/dev-guides-and-walkthroughs/tool-plugin)
## **データソースプラグインの種類**
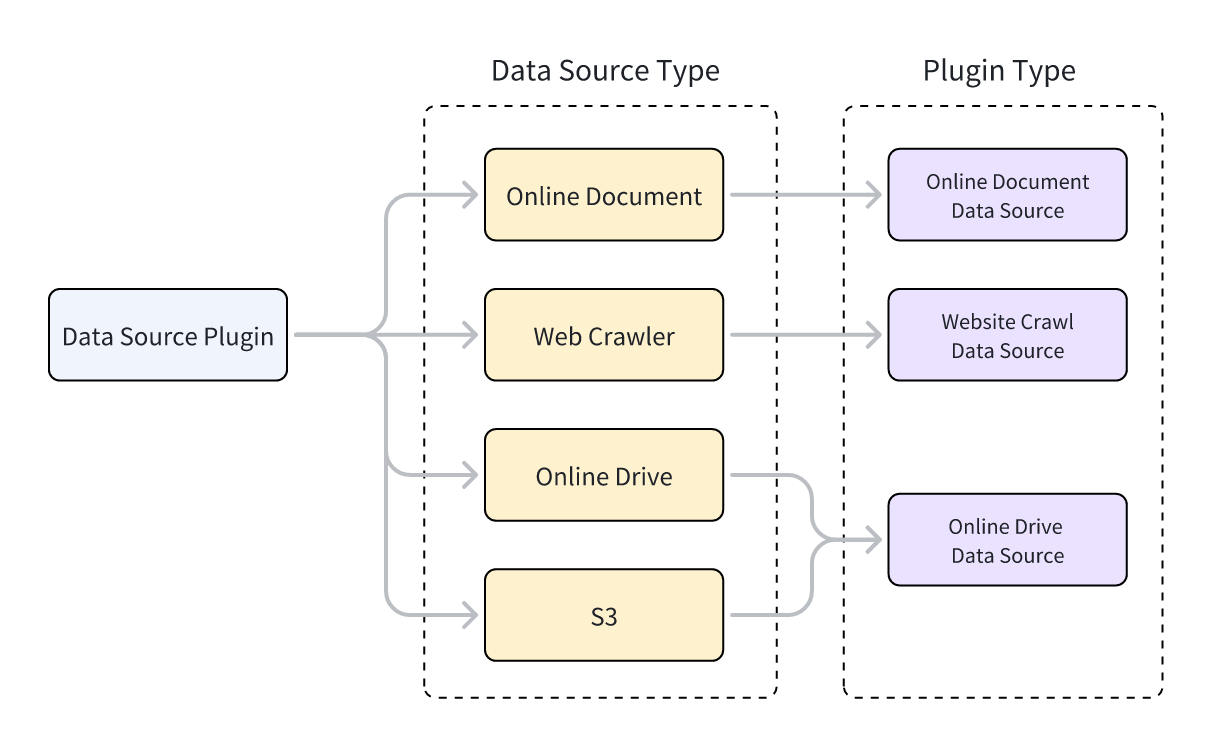
Difyは3種類のデータソースプラグインをサポートしています:Webクローラー、オンラインドキュメント、オンラインドライブ。プラグインコードを実装する際、プラグインの機能を提供するクラスは特定のデータソースクラスを継承する必要があります。3種類のプラグインタイプはそれぞれ異なる親クラスに対応しています。
親クラスを継承してプラグイン機能を実装する方法については、[Difyプラグイン開発:Hello Worldガイド - 4.4 ツールロジックの実装](/ja/develop-plugin/dev-guides-and-walkthroughs/tool-plugin#4-4-implementing-tool-logic)を参照してください。
各データソースプラグインタイプは複数のデータソースをサポートしています。例えば:
* **Webクローラー**:Jina Reader、FireCrawl
* **オンラインドキュメント**:Notion、Confluence、GitHub
* **オンラインドライブ**:OneDrive、Google Drive、Box、AWS S3、Tencent COS
データソースタイプとデータソースプラグインタイプの関係を以下に示します。
 ## データソースプラグインの開発
### データソースプラグインの作成
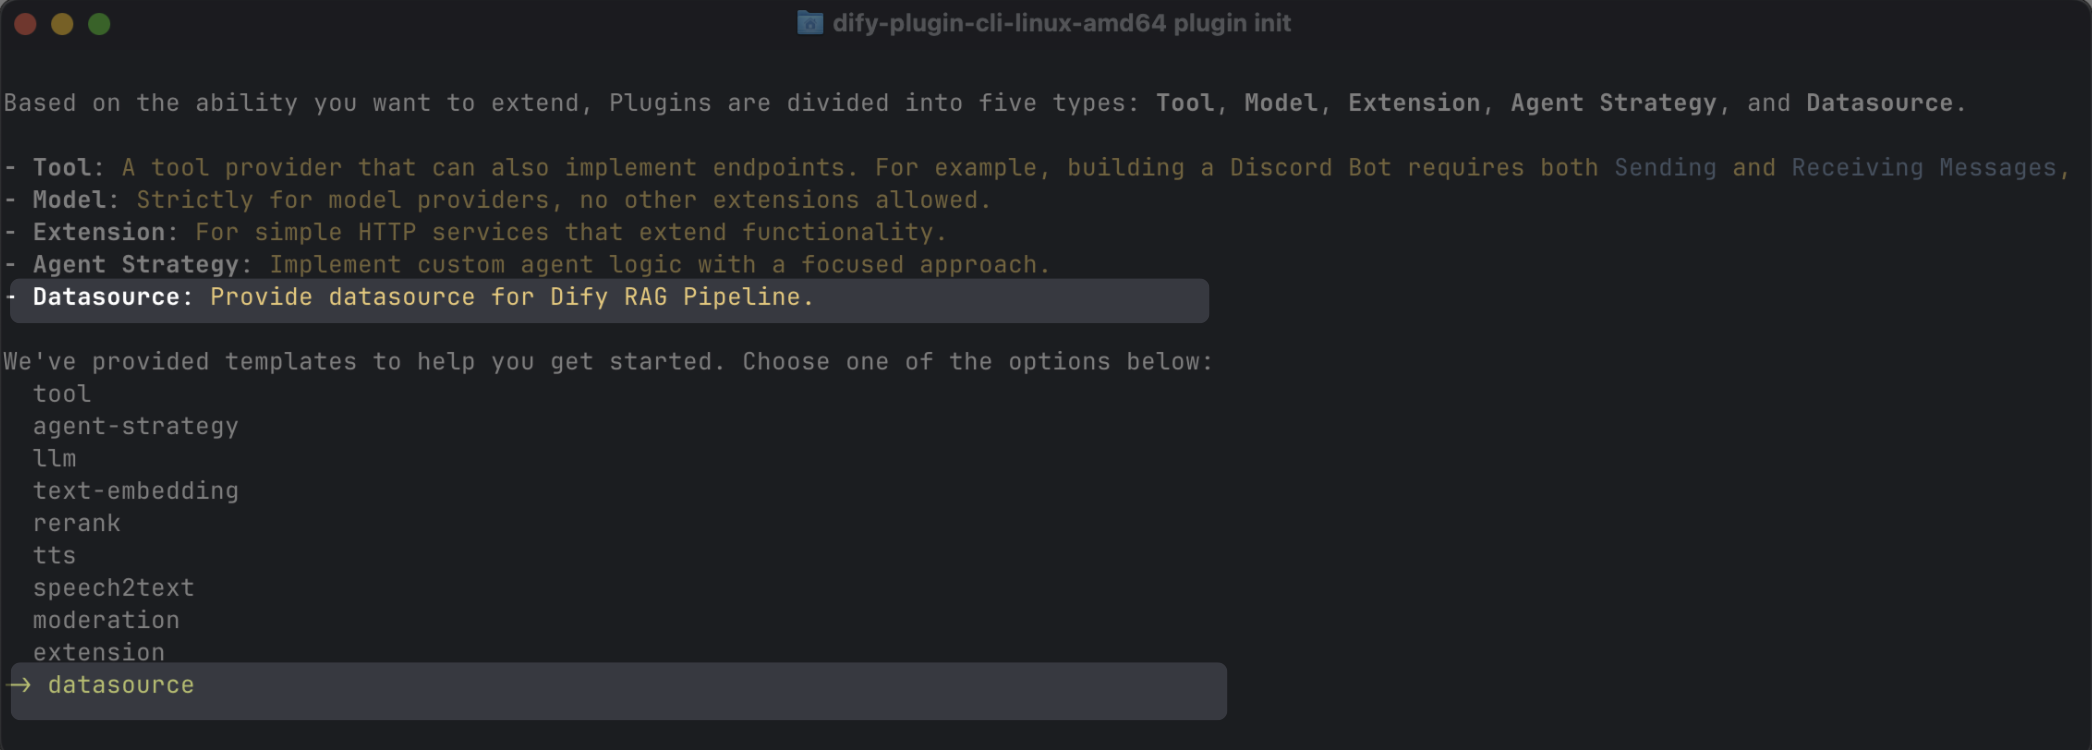
スキャフォールディングコマンドラインツールを使用して、`datasource`タイプを選択することでデータソースプラグインを作成できます。セットアップが完了すると、コマンドラインツールが自動的にプラグインプロジェクトコードを生成します。
```powershell theme={null}
dify plugin init
```
## データソースプラグインの開発
### データソースプラグインの作成
スキャフォールディングコマンドラインツールを使用して、`datasource`タイプを選択することでデータソースプラグインを作成できます。セットアップが完了すると、コマンドラインツールが自動的にプラグインプロジェクトコードを生成します。
```powershell theme={null}
dify plugin init
```
 通常、データソースプラグインはDifyプラットフォームの他の機能を使用する必要がないため、追加の権限は必要ありません。
#### データソースプラグインの構造
データソースプラグインは3つの主要コンポーネントで構成されています:
* `manifest.yaml`ファイル:プラグインの基本情報を記述します。
* `provider`ディレクトリ:プラグインプロバイダーの説明と認証実装コードを含みます。
* `datasources`ディレクトリ:データソースからデータを取得するための説明とコアロジックを含みます。
```
├── _assets
│ └── icon.svg
├── datasources
│ ├── your_datasource.py
│ └── your_datasource.yaml
├── main.py
├── manifest.yaml
├── PRIVACY.md
├── provider
│ ├── your_datasource.py
│ └── your_datasource.yaml
├── README.md
└── requirements.txt
```
#### 正しいバージョンとタグの設定
* `manifest.yaml`ファイルで、最小サポートDifyバージョンを以下のように設定します:
```yaml theme={null}
minimum_dify_version: 1.9.0
```
* `manifest.yaml`ファイルで、Dify Marketplaceのデータソースカテゴリにプラグインを表示するために以下のタグを追加します:
```yaml theme={null}
tags:
- rag
```
* `requirements.txt`ファイルで、データソースプラグイン開発に使用するプラグインSDKバージョンを以下のように設定します:
```yaml theme={null}
dify-plugin>=0.5.0,<0.6.0
```
### データソースプロバイダーの追加
#### プロバイダーYAMLファイルの作成
プロバイダーYAMLファイルの内容は基本的にツールプラグインと同じですが、以下の2点のみ異なります:
```yaml theme={null}
# データソースプラグインのプロバイダータイプを指定:online_drive、online_document、またはwebsite_crawl
provider_type: online_drive # online_document, website_crawl
# データソースを指定
datasources:
- datasources/PluginName.yaml
```
プロバイダーYAMLファイルの作成について詳しくは、[Difyプラグイン開発:Hello Worldガイド-4.3 プロバイダー認証情報の設定](/ja/develop-plugin/dev-guides-and-walkthroughs/tool-plugin#4-3-configuring-provider-credentials)を参照してください。
データソースプラグインはOAuth 2.0またはAPIキーによる認証をサポートしています。
OAuthの設定については、[ツールプラグインにOAuthサポートを追加する](/ja/develop-plugin/dev-guides-and-walkthroughs/tool-oauth)を参照してください。
#### プロバイダーコードファイルの作成
* APIキー認証モードを使用する場合、データソースプラグインのプロバイダーコードファイルはツールプラグインと同一です。プロバイダークラスが継承する親クラスを`DatasourceProvider`に変更するだけです。
```python theme={null}
class YourDatasourceProvider(DatasourceProvider):
def _validate_credentials(self, credentials: Mapping[str, Any]) -> None:
try:
"""
IMPLEMENT YOUR VALIDATION HERE
"""
except Exception as e:
raise ToolProviderCredentialValidationError(str(e))
```
* OAuth認証モードを使用する場合、データソースプラグインはツールプラグインとわずかに異なります。OAuthでアクセス権限を取得する際、データソースプラグインはフロントエンドに表示するユーザー名とアバターを同時に返すことができます。そのため、`_oauth_get_credentials`と`_oauth_refresh_credentials`は`name`、`avatar_url`、`expires_at`、`credentials`を含む`DatasourceOAuthCredentials`型を返す必要があります。
`DatasourceOAuthCredentials`クラスは以下のように定義されており、返す際に対応する型を設定する必要があります:
```python theme={null}
class DatasourceOAuthCredentials(BaseModel):
name: str | None = Field(None, description="The name of the OAuth credential")
avatar_url: str | None = Field(None, description="The avatar url of the OAuth")
credentials: Mapping[str, Any] = Field(..., description="The credentials of the OAuth")
expires_at: int | None = Field(
default=-1,
description="""The expiration timestamp (in seconds since Unix epoch, UTC) of the credentials.
Set to -1 or None if the credentials do not expire.""",
)
```
`_oauth_get_authorization_url`、`_oauth_get_credentials`、`_oauth_refresh_credentials`の関数シグネチャは以下の通りです:
```python theme={null}
def _oauth_get_authorization_url(self, redirect_uri: str, system_credentials: Mapping[str, Any]) -> str:
"""
Generate the authorization URL for {{ .PluginName }} OAuth.
"""
try:
"""
IMPLEMENT YOUR AUTHORIZATION URL GENERATION HERE
"""
except Exception as e:
raise DatasourceOAuthError(str(e))
return ""
```
```python theme={null}
def _oauth_get_credentials(
self, redirect_uri: str, system_credentials: Mapping[str, Any], request: Request
) -> DatasourceOAuthCredentials:
"""
Exchange code for access_token.
"""
try:
"""
IMPLEMENT YOUR CREDENTIALS EXCHANGE HERE
"""
except Exception as e:
raise DatasourceOAuthError(str(e))
return DatasourceOAuthCredentials(
name="",
avatar_url="",
expires_at=-1,
credentials={},
)
```
```python theme={null}
def _oauth_refresh_credentials(
self, redirect_uri: str, system_credentials: Mapping[str, Any], credentials: Mapping[str, Any]
) -> DatasourceOAuthCredentials:
"""
Refresh the credentials
"""
return DatasourceOAuthCredentials(
name="",
avatar_url="",
expires_at=-1,
credentials={},
)
```
### データソースの追加
YAMLファイル形式とデータソースコード形式は、3種類のデータソースによって異なります。
#### Webクローラー
WebクローラーデータソースプラグインのプロバイダーYAMLファイルでは、`output_schema`は常に4つのパラメータを返す必要があります:`source_url`、`content`、`title`、`description`。
```yaml theme={null}
output_schema:
type: object
properties:
source_url:
type: string
description: the source url of the website
content:
type: string
description: the content from the website
title:
type: string
description: the title of the website
"description":
type: string
description: the description of the website
```
Webクローラープラグインのメインロジックコードでは、クラスは`WebsiteCrawlDatasource`を継承し、`_get_website_crawl`メソッドを実装する必要があります。次に、`create_crawl_message`メソッドを使用してWebクロールメッセージを返します。
複数のWebページをクロールしてバッチで返すには、`WebSiteInfo.status`を`processing`に設定し、`create_crawl_message`メソッドを使用して各バッチのクロールされたページを返します。すべてのページがクロールされた後、`WebSiteInfo.status`を`completed`に設定します。
```python theme={null}
class YourDataSource(WebsiteCrawlDatasource):
def _get_website_crawl(
self, datasource_parameters: dict[str, Any]
) -> Generator[ToolInvokeMessage, None, None]:
crawl_res = WebSiteInfo(web_info_list=[], status="", total=0, completed=0)
crawl_res.status = "processing"
yield self.create_crawl_message(crawl_res)
### your crawl logic
...
crawl_res.status = "completed"
crawl_res.web_info_list = [
WebSiteInfoDetail(
title="",
source_url="",
description="",
content="",
)
]
crawl_res.total = 1
crawl_res.completed = 1
yield self.create_crawl_message(crawl_res)
```
#### オンラインドキュメント
オンラインドキュメントデータソースプラグインの戻り値には、ドキュメントの内容を表す`content`フィールドを少なくとも含める必要があります。例えば:
```yaml theme={null}
output_schema:
type: object
properties:
workspace_id:
type: string
description: workspace id
page_id:
type: string
description: page id
content:
type: string
description: page content
```
オンラインドキュメントプラグインのメインロジックコードでは、クラスは`OnlineDocumentDatasource`を継承し、2つのメソッドを実装する必要があります:`_get_pages`と`_get_content`。
ユーザーがプラグインを実行すると、まず`_get_pages`メソッドを呼び出してドキュメントのリストを取得します。ユーザーがリストからドキュメントを選択した後、`_get_content`メソッドを呼び出してドキュメントのコンテンツを取得します。
```python theme={null}
def _get_pages(self, datasource_parameters: dict[str, Any]) -> DatasourceGetPagesResponse:
# your get pages logic
response = requests.get(url, headers=headers, params=params, timeout=30)
pages = []
for item in response.json().get("results", []):
page = OnlineDocumentPage(
page_name=item.get("title", ""),
page_id=item.get("id", ""),
type="page",
last_edited_time=item.get("version", {}).get("createdAt", ""),
parent_id=item.get("parentId", ""),
page_icon=None,
)
pages.append(page)
online_document_info = OnlineDocumentInfo(
workspace_name=workspace_name,
workspace_icon=workspace_icon,
workspace_id=workspace_id,
pages=[page],
total=pages.length(),
)
return DatasourceGetPagesResponse(result=[online_document_info])
```
```python theme={null}
def _get_content(self, page: GetOnlineDocumentPageContentRequest) -> Generator[DatasourceMessage, None, None]:
# your fetch content logic, example
response = requests.get(url, headers=headers, params=params, timeout=30)
...
yield self.create_variable_message("content", "")
yield self.create_variable_message("page_id", "")
yield self.create_variable_message("workspace_id", "")
```
#### オンラインドライブ
オンラインドライブデータソースプラグインはファイルを返すため、以下の仕様に準拠する必要があります:
```yaml theme={null}
output_schema:
type: object
properties:
file:
$ref: "https://dify.ai/schemas/v1/file.json"
```
オンラインドライブプラグインのメインロジックコードでは、クラスは`OnlineDriveDatasource`を継承し、2つのメソッドを実装する必要があります:`_browse_files`と`_download_file`。
ユーザーがプラグインを実行すると、まず`_browse_files`を呼び出してファイルリストを取得します。この時点で、`prefix`は空であり、ルートディレクトリのファイルリストを要求していることを示します。ファイルリストにはフォルダとファイルタイプの変数が含まれています。ユーザーがフォルダを開くと、`_browse_files`メソッドが再度呼び出されます。この時点で、`OnlineDriveBrowseFilesRequest`の`prefix`はそのフォルダ内のファイルリストを取得するために使用されるフォルダIDになります。
ユーザーがファイルを選択した後、プラグインは`_download_file`メソッドとファイルIDを使用してファイルのコンテンツを取得します。`_get_mime_type_from_filename`メソッドを使用してファイルのMIMEタイプを取得でき、パイプラインが異なるファイルタイプを適切に処理できるようになります。
ファイルリストに複数のファイルが含まれている場合、`OnlineDriveFileBucket.is_truncated`を`True`に設定し、`OnlineDriveFileBucket.next_page_parameters`をファイルリストの次のページを取得するために必要なパラメータ(サービスプロバイダーに応じて次のページのリクエストIDやURLなど)に設定できます。
```python theme={null}
def _browse_files(
self, request: OnlineDriveBrowseFilesRequest
) -> OnlineDriveBrowseFilesResponse:
credentials = self.runtime.credentials
bucket_name = request.bucket
prefix = request.prefix or "" # Allow empty prefix for root folder; When you browse the folder, the prefix is the folder id
max_keys = request.max_keys or 10
next_page_parameters = request.next_page_parameters or {}
files = []
files.append(OnlineDriveFile(
id="",
name="",
size=0,
type="folder" # or "file"
))
return OnlineDriveBrowseFilesResponse(result=[
OnlineDriveFileBucket(
bucket="",
files=files,
is_truncated=False,
next_page_parameters={}
)
])
```
```python theme={null}
def _download_file(self, request: OnlineDriveDownloadFileRequest) -> Generator[DatasourceMessage, None, None]:
credentials = self.runtime.credentials
file_id = request.id
file_content = bytes()
file_name = ""
mime_type = self._get_mime_type_from_filename(file_name)
yield self.create_blob_message(file_content, meta={
"file_name": file_name,
"mime_type": mime_type
})
def _get_mime_type_from_filename(self, filename: str) -> str:
"""Determine MIME type from file extension."""
import mimetypes
mime_type, _ = mimetypes.guess_type(filename)
return mime_type or "application/octet-stream"
```
AWS S3のようなストレージサービスでは、`prefix`、`bucket`、`id`変数には特別な用途があり、開発中に必要に応じて柔軟に適用できます:
* `prefix`:ファイルパスのプレフィックスを表します。例えば、`prefix=container1/folder1/`は`container1`バケット内の`folder1`フォルダからファイルまたはファイルリストを取得します。
* `bucket`:ファイルバケットを表します。例えば、`bucket=container1`は`container1`バケット内のファイルまたはファイルリストを取得します。このフィールドは、非標準S3プロトコルドライブでは空白のままにできます。
* `id`:`_download_file`メソッドは`prefix`変数を使用しないため、完全なファイルパスを`id`に含める必要があります。例えば、`id=container1/folder1/file1.txt`は`container1`バケット内の`folder1`フォルダから`file1.txt`ファイルを取得することを示します。
[公式Google Driveプラグイン](https://github.com/langgenius/dify-official-plugins/blob/main/datasources/google_cloud_storage/datasources/google_cloud_storage.py)と[公式AWS S3プラグイン](https://github.com/langgenius/dify-official-plugins/blob/main/datasources/aws_s3_storage/datasources/aws_s3_storage.py)の具体的な実装を参照できます。
## プラグインのデバッグ
データソースプラグインは、リモートデバッグまたはローカルプラグインとしてインストールしてデバッグする2つのデバッグ方法をサポートしています。以下の点に注意してください:
* プラグインがOAuth認証を使用している場合、リモートデバッグの`redirect_uri`はローカルプラグインのものとは異なります。サービスプロバイダーのOAuth Appの関連設定を適宜更新してください。
* データソースプラグインはシングルステップデバッグをサポートしていますが、完全な機能を確保するために、完全なナレッジパイプラインでテストすることをお勧めします。
## 最終チェック
パッケージ化と公開の前に、以下のすべてを完了していることを確認してください:
* 最小サポートDifyバージョンを`1.9.0`に設定。
* SDKバージョンを`dify-plugin>=0.5.0,<0.6.0`に設定。
* `README.md`と`PRIVACY.md`ファイルを作成。
* コードファイルには英語のコンテンツのみを含める。
* デフォルトアイコンをデータソースプロバイダーのロゴに置き換える。
## パッケージ化と公開
プラグインディレクトリで以下のコマンドを実行して`.difypkg`プラグインパッケージを生成します:
```
dify plugin package . -o your_datasource.difypkg
```
次に、以下のことができます:
* Dify環境にプラグインをインポートして使用する。
* プルリクエストを送信してDify Marketplaceにプラグインを公開する。
プラグイン公開プロセスについては、[プラグインの公開](/ja/develop-plugin/publishing/marketplace-listing/release-overview)を参照してください。
***
[Edit this page](https://github.com/langgenius/dify-docs/edit/main/en/develop-plugin/dev-guides-and-walkthroughs/datasource-plugin.mdx) | [Report an issue](https://github.com/langgenius/dify-docs/issues/new?template=docs.yml)
通常、データソースプラグインはDifyプラットフォームの他の機能を使用する必要がないため、追加の権限は必要ありません。
#### データソースプラグインの構造
データソースプラグインは3つの主要コンポーネントで構成されています:
* `manifest.yaml`ファイル:プラグインの基本情報を記述します。
* `provider`ディレクトリ:プラグインプロバイダーの説明と認証実装コードを含みます。
* `datasources`ディレクトリ:データソースからデータを取得するための説明とコアロジックを含みます。
```
├── _assets
│ └── icon.svg
├── datasources
│ ├── your_datasource.py
│ └── your_datasource.yaml
├── main.py
├── manifest.yaml
├── PRIVACY.md
├── provider
│ ├── your_datasource.py
│ └── your_datasource.yaml
├── README.md
└── requirements.txt
```
#### 正しいバージョンとタグの設定
* `manifest.yaml`ファイルで、最小サポートDifyバージョンを以下のように設定します:
```yaml theme={null}
minimum_dify_version: 1.9.0
```
* `manifest.yaml`ファイルで、Dify Marketplaceのデータソースカテゴリにプラグインを表示するために以下のタグを追加します:
```yaml theme={null}
tags:
- rag
```
* `requirements.txt`ファイルで、データソースプラグイン開発に使用するプラグインSDKバージョンを以下のように設定します:
```yaml theme={null}
dify-plugin>=0.5.0,<0.6.0
```
### データソースプロバイダーの追加
#### プロバイダーYAMLファイルの作成
プロバイダーYAMLファイルの内容は基本的にツールプラグインと同じですが、以下の2点のみ異なります:
```yaml theme={null}
# データソースプラグインのプロバイダータイプを指定:online_drive、online_document、またはwebsite_crawl
provider_type: online_drive # online_document, website_crawl
# データソースを指定
datasources:
- datasources/PluginName.yaml
```
プロバイダーYAMLファイルの作成について詳しくは、[Difyプラグイン開発:Hello Worldガイド-4.3 プロバイダー認証情報の設定](/ja/develop-plugin/dev-guides-and-walkthroughs/tool-plugin#4-3-configuring-provider-credentials)を参照してください。
データソースプラグインはOAuth 2.0またはAPIキーによる認証をサポートしています。
OAuthの設定については、[ツールプラグインにOAuthサポートを追加する](/ja/develop-plugin/dev-guides-and-walkthroughs/tool-oauth)を参照してください。
#### プロバイダーコードファイルの作成
* APIキー認証モードを使用する場合、データソースプラグインのプロバイダーコードファイルはツールプラグインと同一です。プロバイダークラスが継承する親クラスを`DatasourceProvider`に変更するだけです。
```python theme={null}
class YourDatasourceProvider(DatasourceProvider):
def _validate_credentials(self, credentials: Mapping[str, Any]) -> None:
try:
"""
IMPLEMENT YOUR VALIDATION HERE
"""
except Exception as e:
raise ToolProviderCredentialValidationError(str(e))
```
* OAuth認証モードを使用する場合、データソースプラグインはツールプラグインとわずかに異なります。OAuthでアクセス権限を取得する際、データソースプラグインはフロントエンドに表示するユーザー名とアバターを同時に返すことができます。そのため、`_oauth_get_credentials`と`_oauth_refresh_credentials`は`name`、`avatar_url`、`expires_at`、`credentials`を含む`DatasourceOAuthCredentials`型を返す必要があります。
`DatasourceOAuthCredentials`クラスは以下のように定義されており、返す際に対応する型を設定する必要があります:
```python theme={null}
class DatasourceOAuthCredentials(BaseModel):
name: str | None = Field(None, description="The name of the OAuth credential")
avatar_url: str | None = Field(None, description="The avatar url of the OAuth")
credentials: Mapping[str, Any] = Field(..., description="The credentials of the OAuth")
expires_at: int | None = Field(
default=-1,
description="""The expiration timestamp (in seconds since Unix epoch, UTC) of the credentials.
Set to -1 or None if the credentials do not expire.""",
)
```
`_oauth_get_authorization_url`、`_oauth_get_credentials`、`_oauth_refresh_credentials`の関数シグネチャは以下の通りです:
```python theme={null}
def _oauth_get_authorization_url(self, redirect_uri: str, system_credentials: Mapping[str, Any]) -> str:
"""
Generate the authorization URL for {{ .PluginName }} OAuth.
"""
try:
"""
IMPLEMENT YOUR AUTHORIZATION URL GENERATION HERE
"""
except Exception as e:
raise DatasourceOAuthError(str(e))
return ""
```
```python theme={null}
def _oauth_get_credentials(
self, redirect_uri: str, system_credentials: Mapping[str, Any], request: Request
) -> DatasourceOAuthCredentials:
"""
Exchange code for access_token.
"""
try:
"""
IMPLEMENT YOUR CREDENTIALS EXCHANGE HERE
"""
except Exception as e:
raise DatasourceOAuthError(str(e))
return DatasourceOAuthCredentials(
name="",
avatar_url="",
expires_at=-1,
credentials={},
)
```
```python theme={null}
def _oauth_refresh_credentials(
self, redirect_uri: str, system_credentials: Mapping[str, Any], credentials: Mapping[str, Any]
) -> DatasourceOAuthCredentials:
"""
Refresh the credentials
"""
return DatasourceOAuthCredentials(
name="",
avatar_url="",
expires_at=-1,
credentials={},
)
```
### データソースの追加
YAMLファイル形式とデータソースコード形式は、3種類のデータソースによって異なります。
#### Webクローラー
WebクローラーデータソースプラグインのプロバイダーYAMLファイルでは、`output_schema`は常に4つのパラメータを返す必要があります:`source_url`、`content`、`title`、`description`。
```yaml theme={null}
output_schema:
type: object
properties:
source_url:
type: string
description: the source url of the website
content:
type: string
description: the content from the website
title:
type: string
description: the title of the website
"description":
type: string
description: the description of the website
```
Webクローラープラグインのメインロジックコードでは、クラスは`WebsiteCrawlDatasource`を継承し、`_get_website_crawl`メソッドを実装する必要があります。次に、`create_crawl_message`メソッドを使用してWebクロールメッセージを返します。
複数のWebページをクロールしてバッチで返すには、`WebSiteInfo.status`を`processing`に設定し、`create_crawl_message`メソッドを使用して各バッチのクロールされたページを返します。すべてのページがクロールされた後、`WebSiteInfo.status`を`completed`に設定します。
```python theme={null}
class YourDataSource(WebsiteCrawlDatasource):
def _get_website_crawl(
self, datasource_parameters: dict[str, Any]
) -> Generator[ToolInvokeMessage, None, None]:
crawl_res = WebSiteInfo(web_info_list=[], status="", total=0, completed=0)
crawl_res.status = "processing"
yield self.create_crawl_message(crawl_res)
### your crawl logic
...
crawl_res.status = "completed"
crawl_res.web_info_list = [
WebSiteInfoDetail(
title="",
source_url="",
description="",
content="",
)
]
crawl_res.total = 1
crawl_res.completed = 1
yield self.create_crawl_message(crawl_res)
```
#### オンラインドキュメント
オンラインドキュメントデータソースプラグインの戻り値には、ドキュメントの内容を表す`content`フィールドを少なくとも含める必要があります。例えば:
```yaml theme={null}
output_schema:
type: object
properties:
workspace_id:
type: string
description: workspace id
page_id:
type: string
description: page id
content:
type: string
description: page content
```
オンラインドキュメントプラグインのメインロジックコードでは、クラスは`OnlineDocumentDatasource`を継承し、2つのメソッドを実装する必要があります:`_get_pages`と`_get_content`。
ユーザーがプラグインを実行すると、まず`_get_pages`メソッドを呼び出してドキュメントのリストを取得します。ユーザーがリストからドキュメントを選択した後、`_get_content`メソッドを呼び出してドキュメントのコンテンツを取得します。
```python theme={null}
def _get_pages(self, datasource_parameters: dict[str, Any]) -> DatasourceGetPagesResponse:
# your get pages logic
response = requests.get(url, headers=headers, params=params, timeout=30)
pages = []
for item in response.json().get("results", []):
page = OnlineDocumentPage(
page_name=item.get("title", ""),
page_id=item.get("id", ""),
type="page",
last_edited_time=item.get("version", {}).get("createdAt", ""),
parent_id=item.get("parentId", ""),
page_icon=None,
)
pages.append(page)
online_document_info = OnlineDocumentInfo(
workspace_name=workspace_name,
workspace_icon=workspace_icon,
workspace_id=workspace_id,
pages=[page],
total=pages.length(),
)
return DatasourceGetPagesResponse(result=[online_document_info])
```
```python theme={null}
def _get_content(self, page: GetOnlineDocumentPageContentRequest) -> Generator[DatasourceMessage, None, None]:
# your fetch content logic, example
response = requests.get(url, headers=headers, params=params, timeout=30)
...
yield self.create_variable_message("content", "")
yield self.create_variable_message("page_id", "")
yield self.create_variable_message("workspace_id", "")
```
#### オンラインドライブ
オンラインドライブデータソースプラグインはファイルを返すため、以下の仕様に準拠する必要があります:
```yaml theme={null}
output_schema:
type: object
properties:
file:
$ref: "https://dify.ai/schemas/v1/file.json"
```
オンラインドライブプラグインのメインロジックコードでは、クラスは`OnlineDriveDatasource`を継承し、2つのメソッドを実装する必要があります:`_browse_files`と`_download_file`。
ユーザーがプラグインを実行すると、まず`_browse_files`を呼び出してファイルリストを取得します。この時点で、`prefix`は空であり、ルートディレクトリのファイルリストを要求していることを示します。ファイルリストにはフォルダとファイルタイプの変数が含まれています。ユーザーがフォルダを開くと、`_browse_files`メソッドが再度呼び出されます。この時点で、`OnlineDriveBrowseFilesRequest`の`prefix`はそのフォルダ内のファイルリストを取得するために使用されるフォルダIDになります。
ユーザーがファイルを選択した後、プラグインは`_download_file`メソッドとファイルIDを使用してファイルのコンテンツを取得します。`_get_mime_type_from_filename`メソッドを使用してファイルのMIMEタイプを取得でき、パイプラインが異なるファイルタイプを適切に処理できるようになります。
ファイルリストに複数のファイルが含まれている場合、`OnlineDriveFileBucket.is_truncated`を`True`に設定し、`OnlineDriveFileBucket.next_page_parameters`をファイルリストの次のページを取得するために必要なパラメータ(サービスプロバイダーに応じて次のページのリクエストIDやURLなど)に設定できます。
```python theme={null}
def _browse_files(
self, request: OnlineDriveBrowseFilesRequest
) -> OnlineDriveBrowseFilesResponse:
credentials = self.runtime.credentials
bucket_name = request.bucket
prefix = request.prefix or "" # Allow empty prefix for root folder; When you browse the folder, the prefix is the folder id
max_keys = request.max_keys or 10
next_page_parameters = request.next_page_parameters or {}
files = []
files.append(OnlineDriveFile(
id="",
name="",
size=0,
type="folder" # or "file"
))
return OnlineDriveBrowseFilesResponse(result=[
OnlineDriveFileBucket(
bucket="",
files=files,
is_truncated=False,
next_page_parameters={}
)
])
```
```python theme={null}
def _download_file(self, request: OnlineDriveDownloadFileRequest) -> Generator[DatasourceMessage, None, None]:
credentials = self.runtime.credentials
file_id = request.id
file_content = bytes()
file_name = ""
mime_type = self._get_mime_type_from_filename(file_name)
yield self.create_blob_message(file_content, meta={
"file_name": file_name,
"mime_type": mime_type
})
def _get_mime_type_from_filename(self, filename: str) -> str:
"""Determine MIME type from file extension."""
import mimetypes
mime_type, _ = mimetypes.guess_type(filename)
return mime_type or "application/octet-stream"
```
AWS S3のようなストレージサービスでは、`prefix`、`bucket`、`id`変数には特別な用途があり、開発中に必要に応じて柔軟に適用できます:
* `prefix`:ファイルパスのプレフィックスを表します。例えば、`prefix=container1/folder1/`は`container1`バケット内の`folder1`フォルダからファイルまたはファイルリストを取得します。
* `bucket`:ファイルバケットを表します。例えば、`bucket=container1`は`container1`バケット内のファイルまたはファイルリストを取得します。このフィールドは、非標準S3プロトコルドライブでは空白のままにできます。
* `id`:`_download_file`メソッドは`prefix`変数を使用しないため、完全なファイルパスを`id`に含める必要があります。例えば、`id=container1/folder1/file1.txt`は`container1`バケット内の`folder1`フォルダから`file1.txt`ファイルを取得することを示します。
[公式Google Driveプラグイン](https://github.com/langgenius/dify-official-plugins/blob/main/datasources/google_cloud_storage/datasources/google_cloud_storage.py)と[公式AWS S3プラグイン](https://github.com/langgenius/dify-official-plugins/blob/main/datasources/aws_s3_storage/datasources/aws_s3_storage.py)の具体的な実装を参照できます。
## プラグインのデバッグ
データソースプラグインは、リモートデバッグまたはローカルプラグインとしてインストールしてデバッグする2つのデバッグ方法をサポートしています。以下の点に注意してください:
* プラグインがOAuth認証を使用している場合、リモートデバッグの`redirect_uri`はローカルプラグインのものとは異なります。サービスプロバイダーのOAuth Appの関連設定を適宜更新してください。
* データソースプラグインはシングルステップデバッグをサポートしていますが、完全な機能を確保するために、完全なナレッジパイプラインでテストすることをお勧めします。
## 最終チェック
パッケージ化と公開の前に、以下のすべてを完了していることを確認してください:
* 最小サポートDifyバージョンを`1.9.0`に設定。
* SDKバージョンを`dify-plugin>=0.5.0,<0.6.0`に設定。
* `README.md`と`PRIVACY.md`ファイルを作成。
* コードファイルには英語のコンテンツのみを含める。
* デフォルトアイコンをデータソースプロバイダーのロゴに置き換える。
## パッケージ化と公開
プラグインディレクトリで以下のコマンドを実行して`.difypkg`プラグインパッケージを生成します:
```
dify plugin package . -o your_datasource.difypkg
```
次に、以下のことができます:
* Dify環境にプラグインをインポートして使用する。
* プルリクエストを送信してDify Marketplaceにプラグインを公開する。
プラグイン公開プロセスについては、[プラグインの公開](/ja/develop-plugin/publishing/marketplace-listing/release-overview)を参照してください。
***
[Edit this page](https://github.com/langgenius/dify-docs/edit/main/en/develop-plugin/dev-guides-and-walkthroughs/datasource-plugin.mdx) | [Report an issue](https://github.com/langgenius/dify-docs/issues/new?template=docs.yml)