> ## Documentation Index
> Fetch the complete documentation index at: https://dify-6c0370d8-add-new-agent.mintlify.site/llms.txt
> Use this file to discover all available pages before exploring further.
# ツールプラグインにOAuthサポートを追加する
⚠️ このドキュメントはAIによって自動翻訳されています。不正確な部分がある場合は、[英語版](/en/develop-plugin/dev-guides-and-walkthroughs/tool-oauth)を参照してください。
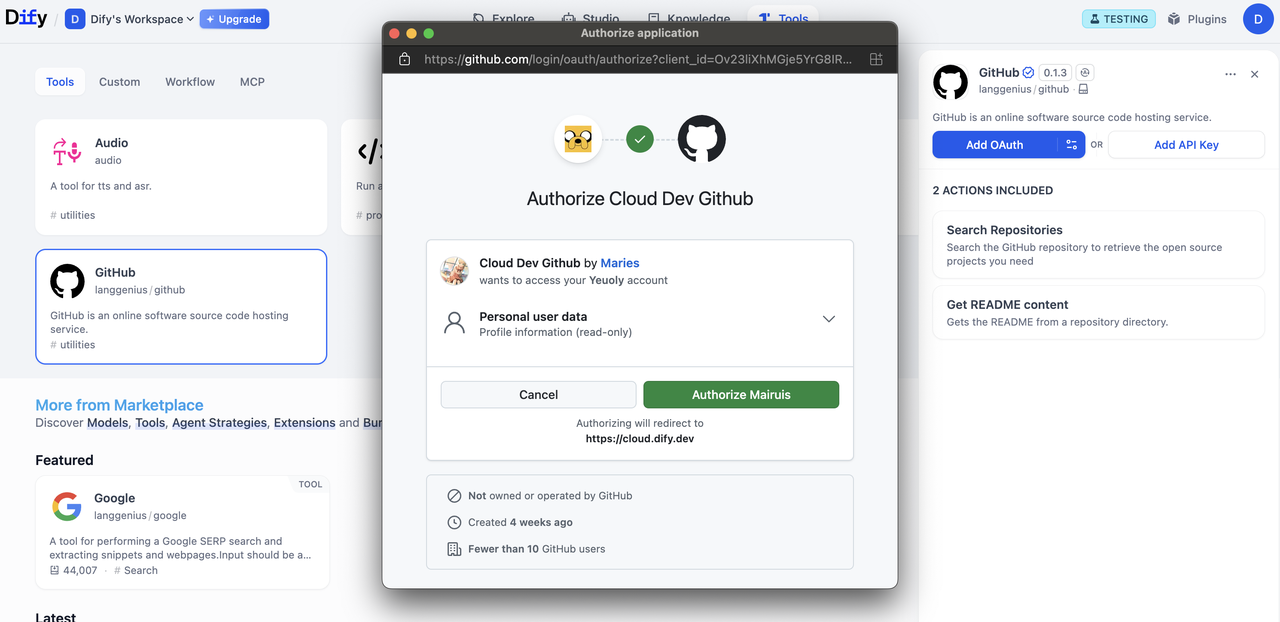 このガイドでは、ツールプラグインに[OAuth](https://oauth.net/2/)サポートを組み込む方法を説明します。
OAuthは、GmailやGitHubなどのサードパーティサービスからユーザーデータにアクセスする必要があるツールプラグインを認可するためのより優れた方法です。ユーザーがAPIキーを手動で入力する必要がなく、OAuthを使用することでツールはユーザーの明示的な同意のもとでユーザーに代わって動作できます。
## 背景
DifyにおけるOAuthには、開発者が理解し設計すべき**2つの別々のフロー**があります。
### フロー1: OAuthクライアントセットアップ(管理者/開発者フロー)
Dify Cloudでは、Difyチームが人気のあるツールプラグイン用のOAuthアプリを作成し、OAuthクライアントをセットアップするため、ユーザーは自分で設定する手間が省けます。
セルフホストDifyインスタンスの管理者は、このセットアップフローを実行する必要があります。
Difyインスタンスの管理者または開発者は、まずサードパーティサービスに信頼できるアプリケーションとしてOAuthアプリを登録する必要があります。これにより、DifyツールプロバイダーをOAuthクライアントとして設定するために必要な資格情報を取得できます。
例として、DifyのGmailツールプロバイダー用のOAuthクライアントをセットアップする手順を示します:
1. [Google Cloud Console](https://console.cloud.google.com)にアクセスし、新しいプロジェクトを作成するか、既存のプロジェクトを選択します
2. 必要なAPI(例:Gmail API)を有効にします
1. **APIs & Services** > **OAuth consent screen**に移動します
2. 公開プラグインの場合は**External**ユーザータイプを選択します
3. アプリケーション名、ユーザーサポートメール、開発者連絡先を入力します
4. 必要に応じて承認済みドメインを追加します
5. テストの場合:**Test users**セクションでテストユーザーを追加します
1. **APIs & Services** > **Credentials**に移動します
2. **Create Credentials** > **OAuth 2.0 Client IDs**をクリックします
3. **Web application**タイプを選択します
4. `client_id`と`client_secret`が生成されます。これらを資格情報として保存します。
OAuthクライアント設定ポップアップにclient\_idとclient\_secretを入力して、ツールプロバイダーをクライアントとしてセットアップします。
このガイドでは、ツールプラグインに[OAuth](https://oauth.net/2/)サポートを組み込む方法を説明します。
OAuthは、GmailやGitHubなどのサードパーティサービスからユーザーデータにアクセスする必要があるツールプラグインを認可するためのより優れた方法です。ユーザーがAPIキーを手動で入力する必要がなく、OAuthを使用することでツールはユーザーの明示的な同意のもとでユーザーに代わって動作できます。
## 背景
DifyにおけるOAuthには、開発者が理解し設計すべき**2つの別々のフロー**があります。
### フロー1: OAuthクライアントセットアップ(管理者/開発者フロー)
Dify Cloudでは、Difyチームが人気のあるツールプラグイン用のOAuthアプリを作成し、OAuthクライアントをセットアップするため、ユーザーは自分で設定する手間が省けます。
セルフホストDifyインスタンスの管理者は、このセットアップフローを実行する必要があります。
Difyインスタンスの管理者または開発者は、まずサードパーティサービスに信頼できるアプリケーションとしてOAuthアプリを登録する必要があります。これにより、DifyツールプロバイダーをOAuthクライアントとして設定するために必要な資格情報を取得できます。
例として、DifyのGmailツールプロバイダー用のOAuthクライアントをセットアップする手順を示します:
1. [Google Cloud Console](https://console.cloud.google.com)にアクセスし、新しいプロジェクトを作成するか、既存のプロジェクトを選択します
2. 必要なAPI(例:Gmail API)を有効にします
1. **APIs & Services** > **OAuth consent screen**に移動します
2. 公開プラグインの場合は**External**ユーザータイプを選択します
3. アプリケーション名、ユーザーサポートメール、開発者連絡先を入力します
4. 必要に応じて承認済みドメインを追加します
5. テストの場合:**Test users**セクションでテストユーザーを追加します
1. **APIs & Services** > **Credentials**に移動します
2. **Create Credentials** > **OAuth 2.0 Client IDs**をクリックします
3. **Web application**タイプを選択します
4. `client_id`と`client_secret`が生成されます。これらを資格情報として保存します。
OAuthクライアント設定ポップアップにclient\_idとclient\_secretを入力して、ツールプロバイダーをクライアントとしてセットアップします。
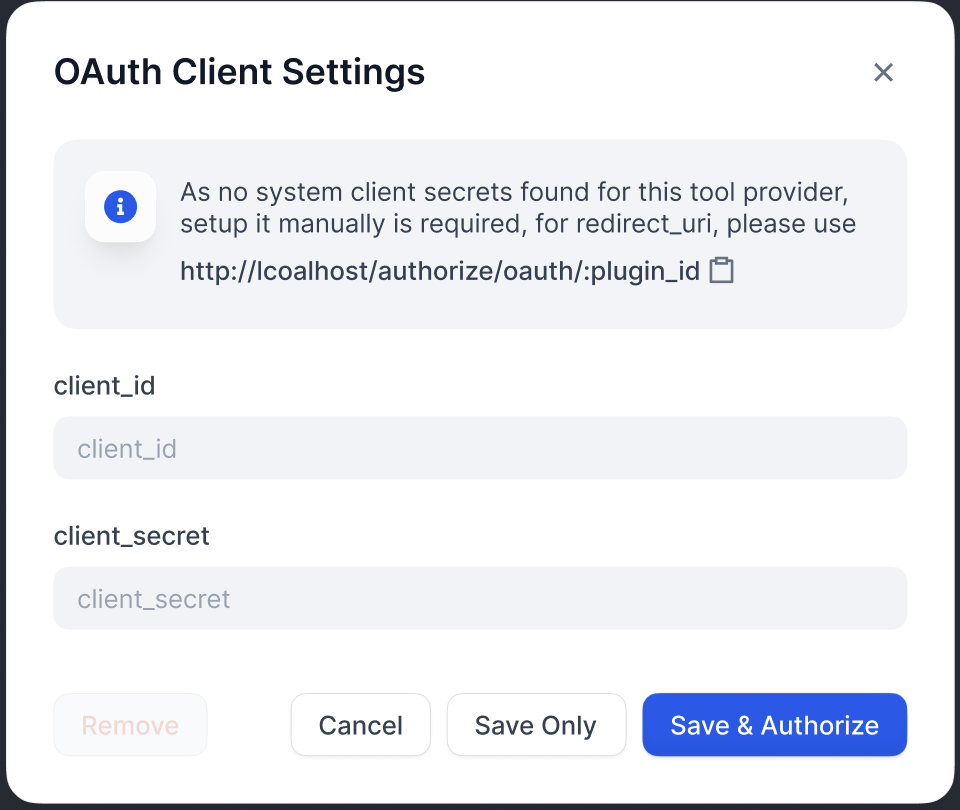 Difyが生成したリダイレクトURIをGoogle OAuthクライアントのページに登録します:
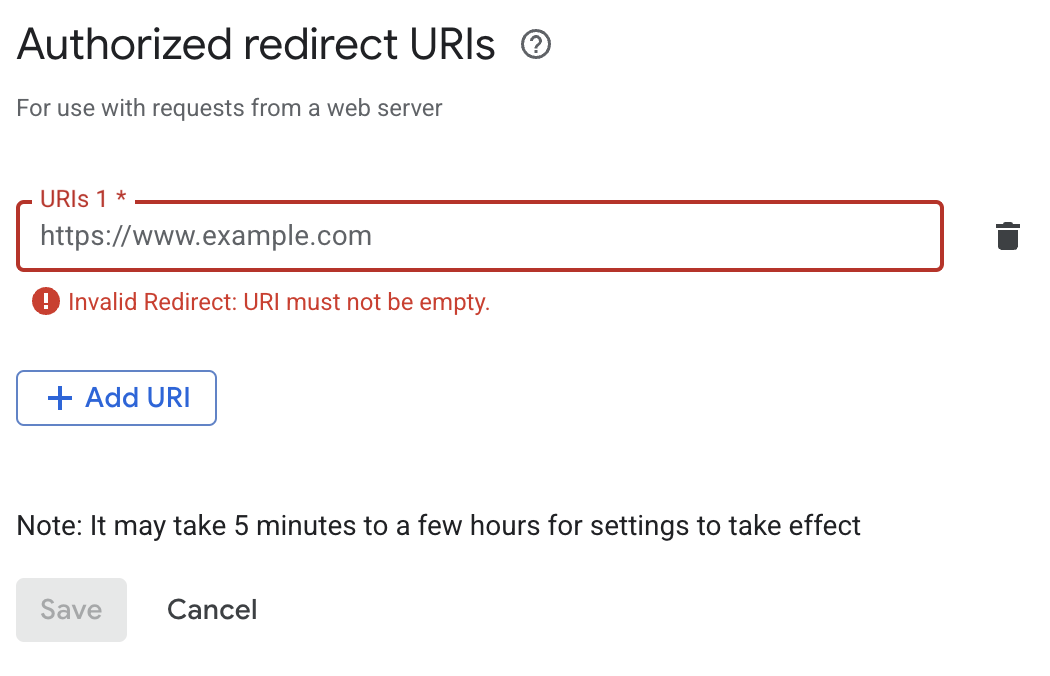 Difyは`redirect_uri`をOAuthクライアント設定ポップアップに表示します。通常、次の形式に従います:
```bash theme={null}
https://{your-dify-domain}/console/api/oauth/plugin/{plugin-id}/{provider-name}/{tool-name}/callback
```
セルフホストDifyの場合、`your-dify-domain`は`CONSOLE_WEB_URL`と一致する必要があります。
各サービスには固有の要件があるため、統合するサービスの特定のOAuthドキュメントを必ず参照してください。
### フロー2: ユーザー認可(Difyユーザーフロー)
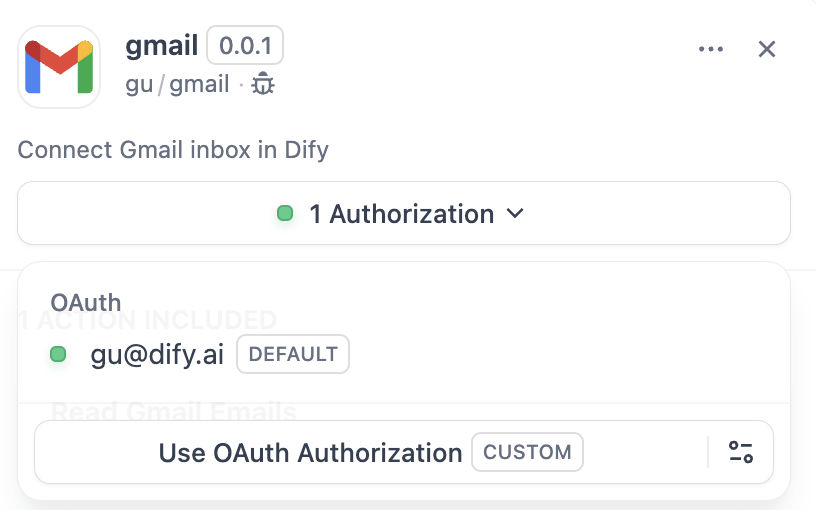
OAuthクライアントを設定した後、個々のDifyユーザーは、プラグインが自分の個人アカウントにアクセスすることを認可できるようになります。
Difyは`redirect_uri`をOAuthクライアント設定ポップアップに表示します。通常、次の形式に従います:
```bash theme={null}
https://{your-dify-domain}/console/api/oauth/plugin/{plugin-id}/{provider-name}/{tool-name}/callback
```
セルフホストDifyの場合、`your-dify-domain`は`CONSOLE_WEB_URL`と一致する必要があります。
各サービスには固有の要件があるため、統合するサービスの特定のOAuthドキュメントを必ず参照してください。
### フロー2: ユーザー認可(Difyユーザーフロー)
OAuthクライアントを設定した後、個々のDifyユーザーは、プラグインが自分の個人アカウントにアクセスすることを認可できるようになります。
 ## 実装
### 1. プロバイダーマニフェストでOAuthスキーマを定義する
プロバイダーマニフェストの`oauth_schema`セクションは、プラグインのOAuthに必要な資格情報と、OAuthフローが生成するものをDifyに伝えます。OAuthをセットアップするには、2つのスキーマが必要です:
#### client\_schema
OAuthクライアントセットアップの入力を定義します:
```yaml gmail.yaml theme={null}
oauth_schema:
client_schema:
- name: "client_id"
type: "secret-input"
required: true
url: "https://developers.google.com/identity/protocols/oauth2"
- name: "client_secret"
type: "secret-input"
required: true
```
`url`フィールドはサードパーティサービスのヘルプドキュメントに直接リンクします。これは困っている管理者/開発者の助けになります。
#### credentials\_schema
ユーザー認可フローが生成するものを指定します(Difyがこれらを自動的に管理します):
```yaml theme={null}
# also under oauth_schema
credentials_schema:
- name: "access_token"
type: "secret-input"
- name: "refresh_token"
type: "secret-input"
- name: "expires_at"
type: "secret-input"
```
OAuth + APIキー認証オプションを提供するには、`oauth_schema`と`credentials_for_provider`の両方を含めてください。
### 2. ツールプロバイダーで必要なOAuthメソッドを完成させる
`ToolProvider`を実装している場所に、以下のインポートを追加します:
```python theme={null}
from dify_plugin.entities.oauth import ToolOAuthCredentials
from dify_plugin.errors.tool import ToolProviderCredentialValidationError, ToolProviderOAuthError
```
`ToolProvider`クラスは、これら3つのOAuthメソッドを実装する必要があります(例として`GmailProvider`を使用):
いかなる場合でも、`ToolOAuthCredentials`の資格情報に`client_secret`を返してはなりません。これはセキュリティ上の問題につながる可能性があります。
```python _oauth_get_authorization_url expandable theme={null}
def _oauth_get_authorization_url(self, redirect_uri: str, system_credentials: Mapping[str, Any]) -> str:
"""
Generate the authorization URL using credentials from OAuth Client Setup Flow.
This URL is where users grant permissions.
"""
# Generate random state for CSRF protection (recommended for all OAuth flows)
state = secrets.token_urlsafe(16)
# Define Gmail-specific scopes - request minimal necessary permissions
scope = "read:user read:data" # Replace with your required scopes
# Assemble Gmail-specific payload
params = {
"client_id": system_credentials["client_id"], # From OAuth Client Setup
"redirect_uri": redirect_uri, # Dify generates this - DON'T modify
"scope": scope,
"response_type": "code", # Standard OAuth authorization code flow
"access_type": "offline", # Critical: gets refresh token (if supported)
"prompt": "consent", # Forces reauth when scopes change (if supported)
"state": state, # CSRF protection
}
return f"{self._AUTH_URL}?{urllib.parse.urlencode(params)}"
```
```python _oauth_get_credentials expandable theme={null}
def _oauth_get_credentials(
self, redirect_uri: str, system_credentials: Mapping[str, Any], request: Request
) -> ToolOAuthCredentials:
"""
Exchange authorization code for access token and refresh token. This is called
to creates ONE credential set for one account connection
"""
# Extract authorization code from OAuth callback
code = request.args.get("code")
if not code:
raise ToolProviderOAuthError("Authorization code not provided")
# Check for authorization errors from OAuth provider
error = request.args.get("error")
if error:
error_description = request.args.get("error_description", "")
raise ToolProviderOAuthError(f"OAuth authorization failed: {error} - {error_description}")
# Exchange authorization code for tokens using OAuth Client Setup credentials
# Assemble Gmail-specific payload
data = {
"client_id": system_credentials["client_id"], # From OAuth Client Setup
"client_secret": system_credentials["client_secret"], # From OAuth Client Setup
"code": code, # From user's authorization
"grant_type": "authorization_code", # Standard OAuth flow type
"redirect_uri": redirect_uri, # Must exactly match authorization URL
}
headers = {"Content-Type": "application/x-www-form-urlencoded"}
try:
response = requests.post(
self._TOKEN_URL,
data=data,
headers=headers,
timeout=10
)
response.raise_for_status()
token_data = response.json()
# Handle OAuth provider errors in response
if "error" in token_data:
error_desc = token_data.get('error_description', token_data['error'])
raise ToolProviderOAuthError(f"Token exchange failed: {error_desc}")
access_token = token_data.get("access_token")
if not access_token:
raise ToolProviderOAuthError("No access token received from provider")
# Build credentials dict matching your credentials_schema
credentials = {
"access_token": access_token,
"token_type": token_data.get("token_type", "Bearer"),
}
# Include refresh token if provided (critical for long-term access)
refresh_token = token_data.get("refresh_token")
if refresh_token:
credentials["refresh_token"] = refresh_token
# Handle token expiration - some providers don't provide expires_in
expires_in = token_data.get("expires_in", 3600) # Default to 1 hour
expires_at = int(time.time()) + expires_in
return ToolOAuthCredentials(credentials=credentials, expires_at=expires_at)
except requests.RequestException as e:
raise ToolProviderOAuthError(f"Network error during token exchange: {str(e)}")
except Exception as e:
raise ToolProviderOAuthError(f"Failed to exchange authorization code: {str(e)}")
```
```python _oauth_refresh_credentials theme={null}
def _oauth_refresh_credentials(
self, redirect_uri: str, system_credentials: Mapping[str, Any], credentials: Mapping[str, Any]
) -> ToolOAuthCredentials:
"""
Refresh the credentials using refresh token.
Dify calls this automatically when tokens expire
"""
refresh_token = credentials.get("refresh_token")
if not refresh_token:
raise ToolProviderOAuthError("No refresh token available")
# Standard OAuth refresh token flow
data = {
"client_id": system_credentials["client_id"], # From OAuth Client Setup
"client_secret": system_credentials["client_secret"], # From OAuth Client Setup
"refresh_token": refresh_token, # From previous authorization
"grant_type": "refresh_token", # OAuth refresh flow
}
headers = {"Content-Type": "application/x-www-form-urlencoded"}
try:
response = requests.post(
self._TOKEN_URL,
data=data,
headers=headers,
timeout=10
)
response.raise_for_status()
token_data = response.json()
# Handle refresh errors
if "error" in token_data:
error_desc = token_data.get('error_description', token_data['error'])
raise ToolProviderOAuthError(f"Token refresh failed: {error_desc}")
access_token = token_data.get("access_token")
if not access_token:
raise ToolProviderOAuthError("No access token received from provider")
# Build new credentials, preserving existing refresh token
new_credentials = {
"access_token": access_token,
"token_type": token_data.get("token_type", "Bearer"),
"refresh_token": refresh_token, # Keep existing refresh token
}
# Handle token expiration
expires_in = token_data.get("expires_in", 3600)
# update refresh token if new one provided
new_refresh_token = token_data.get("refresh_token")
if new_refresh_token:
new_credentials["refresh_token"] = new_refresh_token
# Calculate new expiration timestamp for Dify's token management
expires_at = int(time.time()) + expires_in
return ToolOAuthCredentials(credentials=new_credentials, expires_at=expires_at)
except requests.RequestException as e:
raise ToolProviderOAuthError(f"Network error during token refresh: {str(e)}")
except Exception as e:
raise ToolProviderOAuthError(f"Failed to refresh credentials: {str(e)}")
```
### 3. ツールでトークンにアクセスする
`Tool`実装でOAuth資格情報を使用して認証済みAPI呼び出しを行うことができます:
```python theme={null}
class YourTool(BuiltinTool):
def _invoke(self, user_id: str, tool_parameters: dict[str, Any]) -> ToolInvokeMessage:
if self.runtime.credential_type == CredentialType.OAUTH:
access_token = self.runtime.credentials["access_token"]
response = requests.get("https://api.service.com/data",
headers={"Authorization": f"Bearer {access_token}"})
return self.create_text_message(response.text)
```
`self.runtime.credentials`は現在のユーザーのトークンを自動的に提供します。Difyはリフレッシュを自動的に処理します。
OAuthとAPI\_KEY認証の両方をサポートするプラグインの場合、`self.runtime.credential_type`を使用して2つの認証タイプを区別できます。
### 4. 正しいバージョンを指定する
以前のバージョンのプラグインSDKとDifyはOAuth認証をサポートしていません。そのため、プラグインSDKのバージョンを以下に設定する必要があります:
```
dify_plugin>=0.4.2,<0.5.0.
```
`manifest.yaml`に、最小Difyバージョンを追加します:
```yaml theme={null}
meta:
version: 0.0.1
arch:
- amd64
- arm64
runner:
language: python
version: "3.12"
entrypoint: main
minimum_dify_version: 1.7.1
```
***
[Edit this page](https://github.com/langgenius/dify-docs/edit/main/en/develop-plugin/dev-guides-and-walkthroughs/tool-oauth.mdx) | [Report an issue](https://github.com/langgenius/dify-docs/issues/new?template=docs.yml)
## 実装
### 1. プロバイダーマニフェストでOAuthスキーマを定義する
プロバイダーマニフェストの`oauth_schema`セクションは、プラグインのOAuthに必要な資格情報と、OAuthフローが生成するものをDifyに伝えます。OAuthをセットアップするには、2つのスキーマが必要です:
#### client\_schema
OAuthクライアントセットアップの入力を定義します:
```yaml gmail.yaml theme={null}
oauth_schema:
client_schema:
- name: "client_id"
type: "secret-input"
required: true
url: "https://developers.google.com/identity/protocols/oauth2"
- name: "client_secret"
type: "secret-input"
required: true
```
`url`フィールドはサードパーティサービスのヘルプドキュメントに直接リンクします。これは困っている管理者/開発者の助けになります。
#### credentials\_schema
ユーザー認可フローが生成するものを指定します(Difyがこれらを自動的に管理します):
```yaml theme={null}
# also under oauth_schema
credentials_schema:
- name: "access_token"
type: "secret-input"
- name: "refresh_token"
type: "secret-input"
- name: "expires_at"
type: "secret-input"
```
OAuth + APIキー認証オプションを提供するには、`oauth_schema`と`credentials_for_provider`の両方を含めてください。
### 2. ツールプロバイダーで必要なOAuthメソッドを完成させる
`ToolProvider`を実装している場所に、以下のインポートを追加します:
```python theme={null}
from dify_plugin.entities.oauth import ToolOAuthCredentials
from dify_plugin.errors.tool import ToolProviderCredentialValidationError, ToolProviderOAuthError
```
`ToolProvider`クラスは、これら3つのOAuthメソッドを実装する必要があります(例として`GmailProvider`を使用):
いかなる場合でも、`ToolOAuthCredentials`の資格情報に`client_secret`を返してはなりません。これはセキュリティ上の問題につながる可能性があります。
```python _oauth_get_authorization_url expandable theme={null}
def _oauth_get_authorization_url(self, redirect_uri: str, system_credentials: Mapping[str, Any]) -> str:
"""
Generate the authorization URL using credentials from OAuth Client Setup Flow.
This URL is where users grant permissions.
"""
# Generate random state for CSRF protection (recommended for all OAuth flows)
state = secrets.token_urlsafe(16)
# Define Gmail-specific scopes - request minimal necessary permissions
scope = "read:user read:data" # Replace with your required scopes
# Assemble Gmail-specific payload
params = {
"client_id": system_credentials["client_id"], # From OAuth Client Setup
"redirect_uri": redirect_uri, # Dify generates this - DON'T modify
"scope": scope,
"response_type": "code", # Standard OAuth authorization code flow
"access_type": "offline", # Critical: gets refresh token (if supported)
"prompt": "consent", # Forces reauth when scopes change (if supported)
"state": state, # CSRF protection
}
return f"{self._AUTH_URL}?{urllib.parse.urlencode(params)}"
```
```python _oauth_get_credentials expandable theme={null}
def _oauth_get_credentials(
self, redirect_uri: str, system_credentials: Mapping[str, Any], request: Request
) -> ToolOAuthCredentials:
"""
Exchange authorization code for access token and refresh token. This is called
to creates ONE credential set for one account connection
"""
# Extract authorization code from OAuth callback
code = request.args.get("code")
if not code:
raise ToolProviderOAuthError("Authorization code not provided")
# Check for authorization errors from OAuth provider
error = request.args.get("error")
if error:
error_description = request.args.get("error_description", "")
raise ToolProviderOAuthError(f"OAuth authorization failed: {error} - {error_description}")
# Exchange authorization code for tokens using OAuth Client Setup credentials
# Assemble Gmail-specific payload
data = {
"client_id": system_credentials["client_id"], # From OAuth Client Setup
"client_secret": system_credentials["client_secret"], # From OAuth Client Setup
"code": code, # From user's authorization
"grant_type": "authorization_code", # Standard OAuth flow type
"redirect_uri": redirect_uri, # Must exactly match authorization URL
}
headers = {"Content-Type": "application/x-www-form-urlencoded"}
try:
response = requests.post(
self._TOKEN_URL,
data=data,
headers=headers,
timeout=10
)
response.raise_for_status()
token_data = response.json()
# Handle OAuth provider errors in response
if "error" in token_data:
error_desc = token_data.get('error_description', token_data['error'])
raise ToolProviderOAuthError(f"Token exchange failed: {error_desc}")
access_token = token_data.get("access_token")
if not access_token:
raise ToolProviderOAuthError("No access token received from provider")
# Build credentials dict matching your credentials_schema
credentials = {
"access_token": access_token,
"token_type": token_data.get("token_type", "Bearer"),
}
# Include refresh token if provided (critical for long-term access)
refresh_token = token_data.get("refresh_token")
if refresh_token:
credentials["refresh_token"] = refresh_token
# Handle token expiration - some providers don't provide expires_in
expires_in = token_data.get("expires_in", 3600) # Default to 1 hour
expires_at = int(time.time()) + expires_in
return ToolOAuthCredentials(credentials=credentials, expires_at=expires_at)
except requests.RequestException as e:
raise ToolProviderOAuthError(f"Network error during token exchange: {str(e)}")
except Exception as e:
raise ToolProviderOAuthError(f"Failed to exchange authorization code: {str(e)}")
```
```python _oauth_refresh_credentials theme={null}
def _oauth_refresh_credentials(
self, redirect_uri: str, system_credentials: Mapping[str, Any], credentials: Mapping[str, Any]
) -> ToolOAuthCredentials:
"""
Refresh the credentials using refresh token.
Dify calls this automatically when tokens expire
"""
refresh_token = credentials.get("refresh_token")
if not refresh_token:
raise ToolProviderOAuthError("No refresh token available")
# Standard OAuth refresh token flow
data = {
"client_id": system_credentials["client_id"], # From OAuth Client Setup
"client_secret": system_credentials["client_secret"], # From OAuth Client Setup
"refresh_token": refresh_token, # From previous authorization
"grant_type": "refresh_token", # OAuth refresh flow
}
headers = {"Content-Type": "application/x-www-form-urlencoded"}
try:
response = requests.post(
self._TOKEN_URL,
data=data,
headers=headers,
timeout=10
)
response.raise_for_status()
token_data = response.json()
# Handle refresh errors
if "error" in token_data:
error_desc = token_data.get('error_description', token_data['error'])
raise ToolProviderOAuthError(f"Token refresh failed: {error_desc}")
access_token = token_data.get("access_token")
if not access_token:
raise ToolProviderOAuthError("No access token received from provider")
# Build new credentials, preserving existing refresh token
new_credentials = {
"access_token": access_token,
"token_type": token_data.get("token_type", "Bearer"),
"refresh_token": refresh_token, # Keep existing refresh token
}
# Handle token expiration
expires_in = token_data.get("expires_in", 3600)
# update refresh token if new one provided
new_refresh_token = token_data.get("refresh_token")
if new_refresh_token:
new_credentials["refresh_token"] = new_refresh_token
# Calculate new expiration timestamp for Dify's token management
expires_at = int(time.time()) + expires_in
return ToolOAuthCredentials(credentials=new_credentials, expires_at=expires_at)
except requests.RequestException as e:
raise ToolProviderOAuthError(f"Network error during token refresh: {str(e)}")
except Exception as e:
raise ToolProviderOAuthError(f"Failed to refresh credentials: {str(e)}")
```
### 3. ツールでトークンにアクセスする
`Tool`実装でOAuth資格情報を使用して認証済みAPI呼び出しを行うことができます:
```python theme={null}
class YourTool(BuiltinTool):
def _invoke(self, user_id: str, tool_parameters: dict[str, Any]) -> ToolInvokeMessage:
if self.runtime.credential_type == CredentialType.OAUTH:
access_token = self.runtime.credentials["access_token"]
response = requests.get("https://api.service.com/data",
headers={"Authorization": f"Bearer {access_token}"})
return self.create_text_message(response.text)
```
`self.runtime.credentials`は現在のユーザーのトークンを自動的に提供します。Difyはリフレッシュを自動的に処理します。
OAuthとAPI\_KEY認証の両方をサポートするプラグインの場合、`self.runtime.credential_type`を使用して2つの認証タイプを区別できます。
### 4. 正しいバージョンを指定する
以前のバージョンのプラグインSDKとDifyはOAuth認証をサポートしていません。そのため、プラグインSDKのバージョンを以下に設定する必要があります:
```
dify_plugin>=0.4.2,<0.5.0.
```
`manifest.yaml`に、最小Difyバージョンを追加します:
```yaml theme={null}
meta:
version: 0.0.1
arch:
- amd64
- arm64
runner:
language: python
version: "3.12"
entrypoint: main
minimum_dify_version: 1.7.1
```
***
[Edit this page](https://github.com/langgenius/dify-docs/edit/main/en/develop-plugin/dev-guides-and-walkthroughs/tool-oauth.mdx) | [Report an issue](https://github.com/langgenius/dify-docs/issues/new?template=docs.yml)